
Step-by-step instructions for setting up an SSH server, a VNC server, and an SSH client in order to VNC securely from one computer to another.
![]()
Introduction – RTFM or WTFM.
My new year’s resolution this year was RTFM. When there are (ahem) fine manuals, one can save time by reading them. But in many cases, manuals do not exist, or are not so fine. So I periodically write stuff down (WTFM, as it were) to document stuff. This article provides step-by-step instructions, with lots of screen shots, for setting up an SSH server, a VNC server, and an SSH client in order to VNC securely from one computer to another. All of this can be done with free open-source software.
VNC is a remote-control client/server application that allows a local client computer to connect to a remote server computer over a network. Keyboard and mouse inputs are sent from the local computer to the remote computer, and screen output is sent from the remote computer to the local computer. In this way, a PC can be used to remote-control a Macintosh computer or vice-versa. There are VNC clients and servers for numerous operating systems, including Windows, Macintosh, and Linux. A problem with VNC is that traffic is typically sent in plain text. This can include the username and password of the VNC service itself or of any services you are using via the remote computer.
When a website operator wants to provide a way for users to enter information (such as credit card numbers) securely, the website operator can provide those pages via the HTTPS protocol. HTTPS is the secure version of HTTP, and HTTPS (unlike HTTP) encrypts session data using either a version of the SSL (Secure Socket Layer) protocol or the TLS (Transport Layer Security) protocol.
A VNC session can be made secure by having the client and server connect via an SSH tunnel. All SSH data is encrypted, so all data passing through the tunnel is also encrypted. The resultant secure VNC connection is analogous to the HTTPS connection discussed above.
Step 1 – Install an SSH Server on the Remote Computer.
Step 1.1 – Download and Run Cygwin’s Installer.
Cygwin allows you to run Linux programs on a Windows PC.
Cygwin is not technically an emulation of Linux, it’s a Linux API emulation layer. For more information, see the Cygwin website (http://www.cygwin.com/). Cygwin is free open-source software created by Red Hat, the leading distributor of Linux. Support is available from Red Hat (http://www.redhat.com/software/cygwin/).
To install Cygwin, click on the “Install Cygwin now” icon on the Cygwin website (http://www.cygwin.com/).
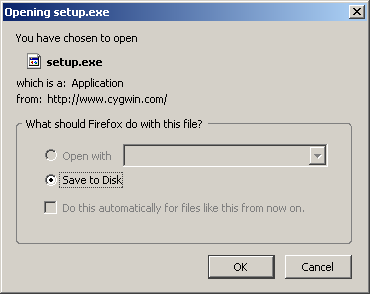
Save the file “setup.exe” as “c:\cygwin\setup.exe”.
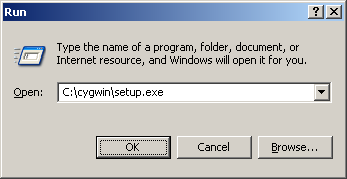
Then run “c:\cygwin\setup.exe” from the Windows “Start” menu.
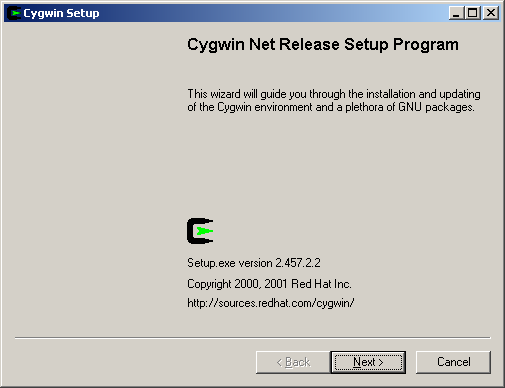
Cygwin’s setup.exe program is designed to be very powerful, which it is. It also happens to be extremely non-intuitive, especially for first-time users. Here is a screen-by-screen step-by-step approach of what to do.
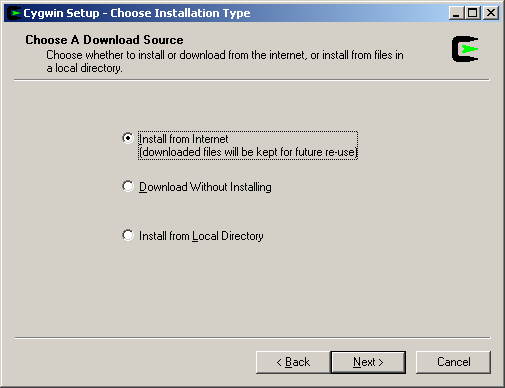
When you first launch the setup program, click the “Next” button.
When you select “Install from Internet,” you are actually downloading packages that setup.exe can install now or later. Select “Install from Internet” for now.
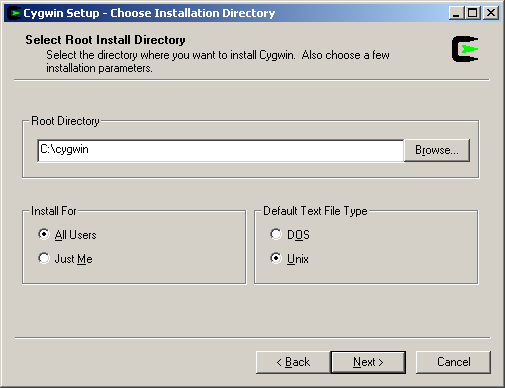
Next, install Cygwin in the “c:\cygwin” directory, install for all users, and use Unix-style text files.
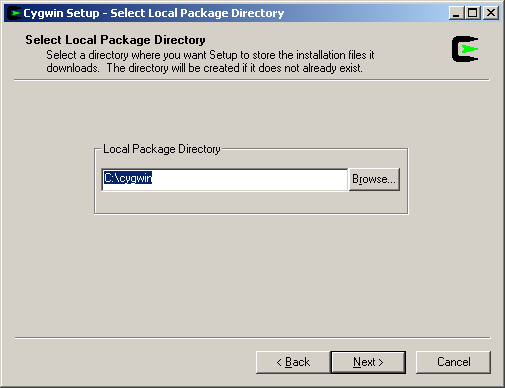
Next, select “c:\cygwin” as the local package directory.
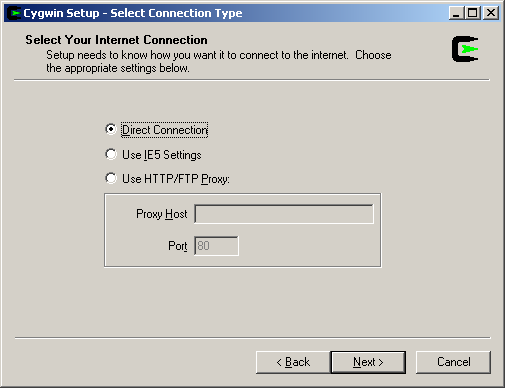
Next, set up your Internet connection type (“Direct Connection” in this example).
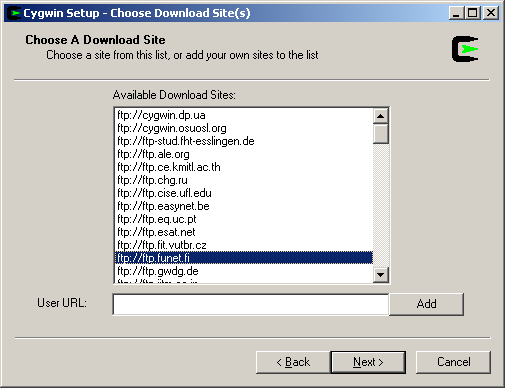
Next, select a download site. You can download by FTP or HTTP and there are lots of sites to choose from. If it’s daytime when you are doing your installation, it probably makes sense to choose a download site where it is nighttime.
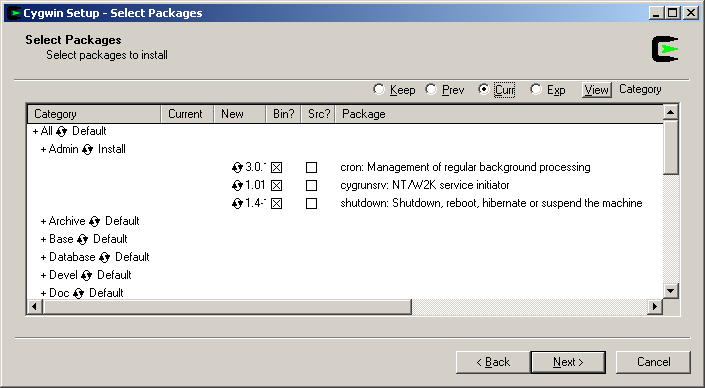
Next, you have to choose which packages to download and install. There are 25 packages from which to choose. You only need to install the Admin package and a few programs from the Net package. I also like to install the Archive package. For all other packages, the default settings should suffice. To expand a package to see its contents, click on the “+” icon next to its name. To change the default settings, click on the icon the the left of the word “Default.” You can choose to install the source (the “Src?” column) or the binary (the “Bin?” column”) for each package, but you will not need the source code for this exercise.
Admin – Install cron, cygrunsrv, shutdown
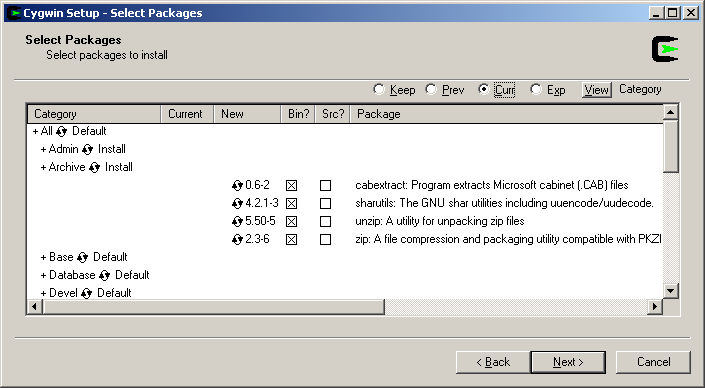
Archive – Install cabextract, sharutils, unzip, zip (note that these are not necessary, but I like to have them)
Base – Default
Database – Default
Devel – Default (note that “gcc” and “make” can be installed from here)
Doc – Default
Editors – Default (note that Emacs (for East Coast Linux hackers) and Vi (for West Coast Linux hackers) can be installed from here)
Games – Default
Gnome – Default
Graphics – Default
Interpreters – Default (note that “perl” can be installed from here)
Libs – Default
Mail – Default
Math – Default
Mingw – Default
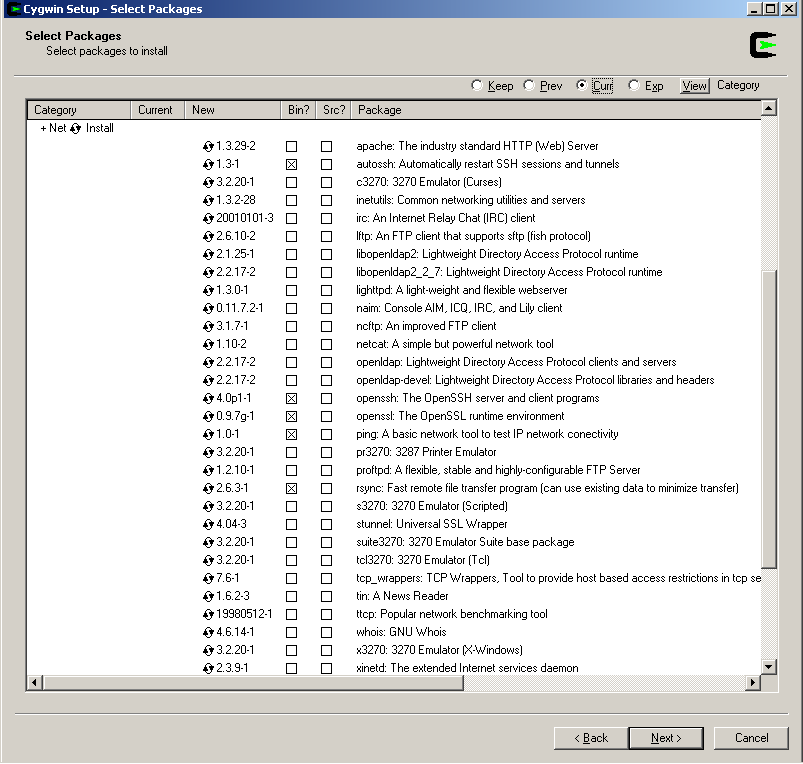
Net – Install autossh, openssh, openssl, ping, rsync (note that ping and rsync are not necessary, but I like to have them)
Publishing – Default
Shells – Default
System – Default
Text – Default
Utils – Default
Web – Default
X11 – Default
ZZZRemovedPackages – Default
_PostInstallLast – Default
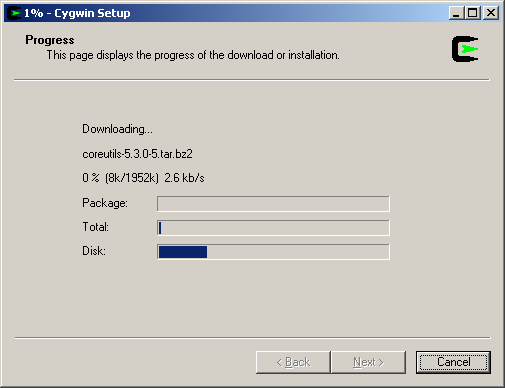
If you get a “download incomplete” error, select another server and try again. Once your packages have started to download, a progress dialog appears like the following. Downloading make take a few minutes.
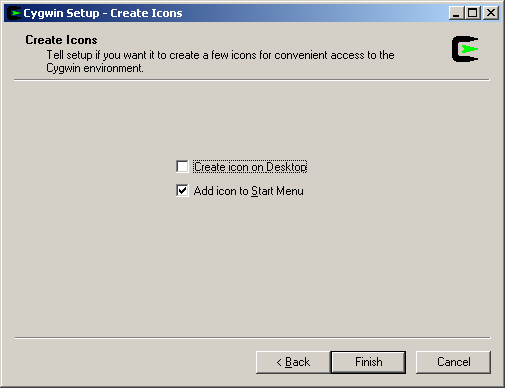
Next, your are prompted to create various Cygwin icons. You may not want an icon on the desktop for all users.
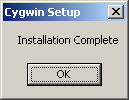
Next, Cygwin optimistically tells you that the installation is complete. Well, not exactly.
Step 1.2 – Configure Windows Environment Variables.
Cygwin relies on a couple of Windows environment variables. To set those variables to their proper values, right-click on the “My Computer” icon, select Properties, then select the “Advanced” tab.
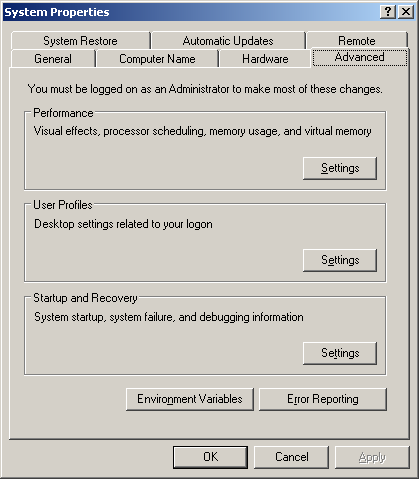
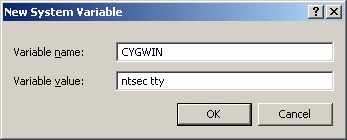
Click the “Environment Variables” button. Under “System Variables” (NOT “User Variables”), click the “New” button. In the “Variable name” field, enter “CYGWIN”. In the “Variable value” field, enter “ntsec tty”.
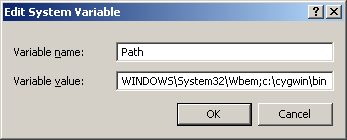
Again under “System Variables” (NOT “User Variables”), select the “Path” variable and click the “Edit” button.
In the “Variable value” field, append “;c:\cygwin\bin” at the end of the current value, which will look something like this:
C:\WINDOWS\system32;C:\WINDOWS;C:\WINDOWS\System32\Wbem;c:\cygwin\bin
Step 1.3 – Setup the sshd.exe Service.
Next, start Cygwin from the “Cygwin Bash Shell” icon and enter “ssh-host-config” at the “$” command-line prompt:
$ ssh-host-config
If cygwin complains that you are missing a program (i.e. a “.dll” file), you’ll have to install the appropriate cygwin package containing the file. You can search for the appropriate package to install at the Cygwin website (http://www.cygwin.com/packages/).
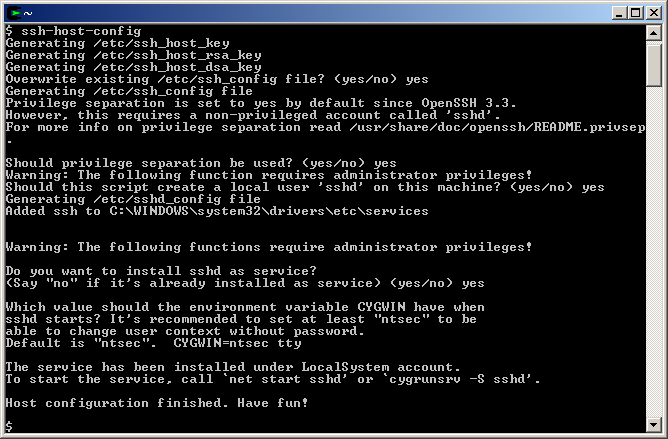
If the “ssh-host-config” program runs properly, you’ll be prompted for various settings.
When you see “Should Privilege separation be used?” enter “yes”.
When you see “Should this script create a local user ‘sshd’ on this machine?” enter “yes”.
When you see “Do you want to install sshd as a service?” enter “yes”.
When you see “CYGWIN=” enter “ntsec tty”.
Step 1.4 – Test the sshd.exe Service.
To test the service, I like to start it, stop it, and re-start it as follows:
$ net start sshd
The CYGWIN sshd service is starting.
The CYGWIN sshd service was started successfully.
$ net stop sshd
The CYGWIN sshd service is stopping.
The CYGWIN sshd service was sopped successfully.
$ net start sshd
The CYGWIN sshd service is starting.
The CYGWIN sshd service was started successfully.
Alternately, you can use “cygrunsrv –start sshd” to start the SSHD service and “cygrunsrv –stop sshd” to stop it.
To ssh to your computer as the current user, enter the following command:
$ ssh 127.0.0.1
The first time you connect to a host computer, you will be told that the authenticity of the host cannot be established and prompted if you want to continue connecting. If you are certain that have entered the address correctly, enter “yes”; otherwise enter “no”.
To ssh to your computer as a different user, enter the following command:
$ ssh "John Q. Public"@127.0.0.1
If your computer has a private IP address, you can also use that IP address instead of 127.0.0.1 (which is “localhost,” your current computer).
Next, test the connection from another computer on your network using your private IP address (“192.168.10.29” in this example). If you are using a software firewall such as Windows Firewall or Zone Labs ZoneAlarm, you’ll have to configure those programs to allow ssh traffic through.
$ ssh "John Q. Public"@192.168.10.29
Step 1.5 – Run sshd.exe on a Non-standard Port.
By default, ssh runs on port 22. This, unfortunately, is a popular port for script kiddies and malicious hackers (note that a true hacker, by default, is not malicious) to probe.
To change the default sshd port, edit the file “C:\cygwin\etc\sshd_config” and change the line that says “Port 22” to “Port 22000” (or some other private port). For more info on port numbers, see http://www.iana.org/assignments/port-numbers.
You may need to copy the file “sshd_config” to another directory, edit it, and copy it back. You’ll also need to use a text editor that properly displays Unix-style text files (unlike Notepad, which comes with Windows). TextPad (http://www.textpad.com/) and OpenOffice (http://www.openoffice.org/) both do the right thing.
Then restart the sshd daemon by re-starting the computer or running this command from the Cygwin shell:
$ net stop sshd
$ net start sshd
Now you can access your ssh server by it’s non-standard port number as follows:
$ ssh -p 22000 "John Q. Public"@192.168.10.29
Step 2 – Port-Forward SSH Traffic from your Router to your SSHD Server.
You’ll need to configure port-forwarding on your router to send incoming ssh traffic to your newly created sshd server computer. Check the support website for your router’s vendor for details of how to set this up on your router. The basic steps are 1) assign a static IP address to each computer that you need to address from outside of your network, and 2) forward traffic on certain port numbers to the pre-defined static IP addresses.
If you have multiple SSH servers sitting behind a single NAT device, then you can access each of them from outside of your network by running each SSH server on its own unique non-standard port.
For example:
For IP address 192.168.10.29, you could run sshd.exe on port 22000.
For IP address 192.168.10.30, you could run sshd.exe on port 22001.
For IP address 192.168.10.31, you could run sshd.exe on port 22002.
Etc.
Step 3 – Install a VNC Server.
Step 3.1 – Download and Run the RealVNC Installer.
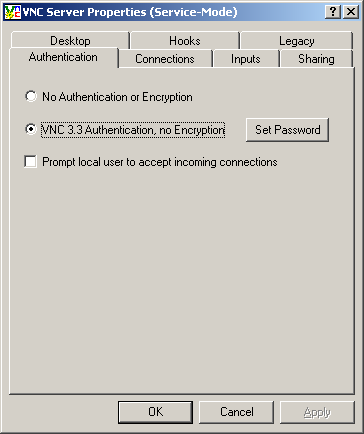
Install RealVNC 4.0 (http://www.realvnc.com/) as a system service. Under “VNC Server configuration” section, select both “Register and configure VNC Server for Service-Mode” and “Start the VNC Server in Service-Mode”. Then click the “Next” button.

Under the Authentication tab, click the “Set Password” button to set a password. Note that this is the password that all clients will use to connect to this computer’s VNC server.
Under the Connections tab, choose your VNC server’s port number. By default, VNC listens for incoming connections on port 5900. It also listens on port 5800 for Java-based users, which can be accessed by clients from a web browser. I don’t like the Java server, so I disable that. And I run multiple VNC clients, each on a unique port, so I never use the default port. In this example, I have set up the VNC server to run on port 5901.
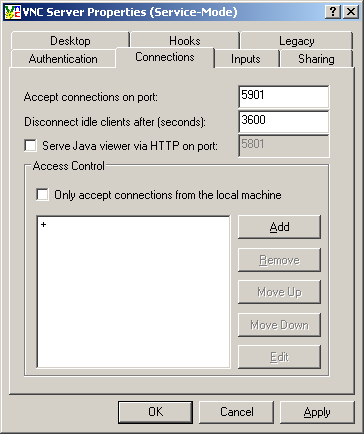
For the rest of the settings, the defaults should suffice. Click “OK” and your VNC server should be set up and running.
Step 3.2 – Test the VNC Server from Another Client Computer on your Network.
From another computer on your network, open the VNC Viewer application and enter your server’s IP address, followed by a colon, followed by the port number on which the server is running. In this example, I entered “192.168.10.29:5901” in the Server field.
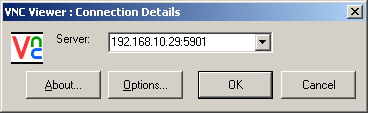
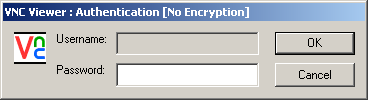
If everything is set up properly, you’ll get a login prompt:

Enter the password for the VNC server (the same password that you just selected in the previous step) and click the “OK” button. You should now see a window showing the remote computer. You can right-click on the VNC icon in the Windows taskbar to configure the VNC Viewer application, switch to full-screen view, etc. You can switch out of full-screen view by typing CTRL-ESC (simultaneously) to access the VNC icon in the Windows taskbar.
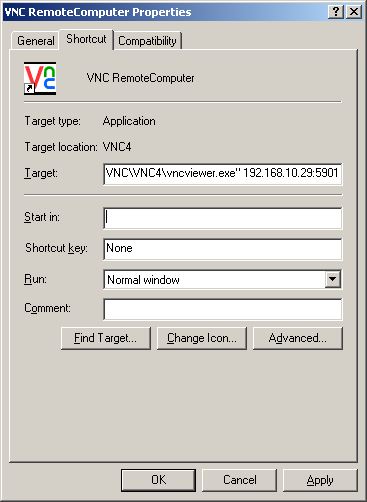
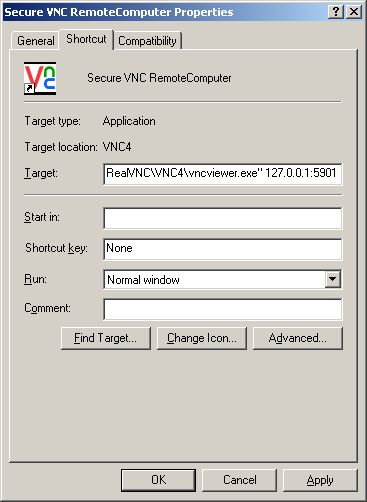
You can also make a shortcut for this connection. Copy the VNC Viewer shortcut to your desktop, and edit the “target” line to include the address of your VNC server. The “Target” field should contain something like the following:
“C:\Program Files\RealVNC\VNC4\vncviewer.exe” 192.168.10.29:5901
Step 4 – Make VNC Secure by Tunneling it Over an SSH Connection.
Now that you have 1) an SSH server running on a unique non-standard port and 2) a VNC server running on a unique port, you can access your VNC server securely from a remote computer. The final step is to configure an SSH client to create a tunnel and point the VNC Viewer application at the tunnel created by the SSH client.
Now you’ll need the public IP address of your router. You can find out your public IP address by going to http://www.whatismyip.com/.
Step 4.1 – Configure DynDNS (For Dynamic IP Addresses).
If your ISP does not provide you with a fixed (static) IP address, you can still access your network, but one more step will be required. For networks that have dynamic IP addresses, you can sign up for a free account with DynDNS.org (http://www.dyndns.org/services/dns/dyndns/) and install a software client on your server computer, such as DynDNS Updater from Kana Solution (http://www.kanasolution.com/). DynDNS Updater periodically sends your computer’s public dynamic IP address to the dyndns.org server, which then associates a domain name (such as remotecomputer.dyndns.org) with your IP address. Whenever your IP address changes, the new information is communicated to the dyndns.org server. In this manner, you can always access your remote computer by domain name (remotecomptuer.dyndns.org), even if you don’t know its IP address.
Step 4.2 – Try One SSH Client – Cygwin.
This example assumes the the public IP address of the remote network is 66.42.17.88 (which is an IP address that I pulled out of my hat). Note that we have set up the SSH server to run on non-standard port 22000 (port 22 is the default) and that VNC is running on port 5901 (5900 is the default).
One ssh client is the one included with Cygwin. From the Cygwin command line, you would enter the following command to ssh to your remote computer on port 2200 and establish a tunnel on port 5901 for VNC traffic:
$ ssh -p 22000 "John Q. Public"@66.42.17.88 -L 5901:127.0.0.1:5901
Step 4.3 – Try Another SSH Client – PuTTY.
Another ssh client is PuTTY (http://www.chiark.greenend.org.uk/~sgtatham/putty/). PuTTY has a graphical user interface and can store multiple configurations for different SSH sessions.
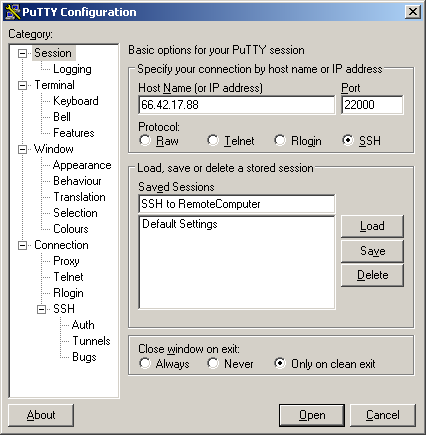
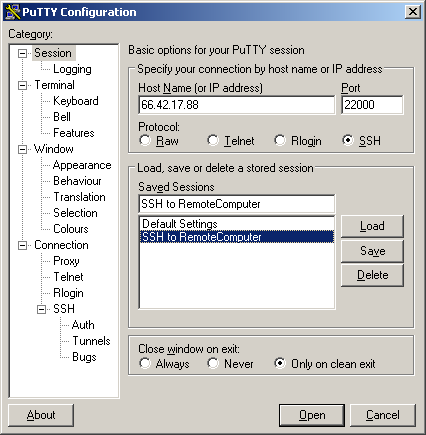
From the Session window, enter:
– your remote computer’s host name or IP address (“66.42.17.88” in this example),
– the port for your SSH server (“22000” in this example),
– the protocol (“SSH” in this example)
– the session name (“SSH to RemoteComputer” in this example)
Don’t load or save the session yet.
Select the Tunnels window (under Connection/SSH/Tunnels). In the “Source port” field, enter the port for your VNC server (“5901” in this example), and in the “Destination” field, enter 127.0.0.1, a colon, and the port for your VNC server (“127.0.0.1:5901” in this example).
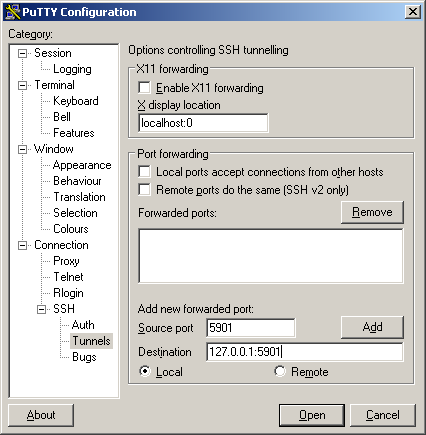
Then click the “Add” button. Now you have a tunnel set up.
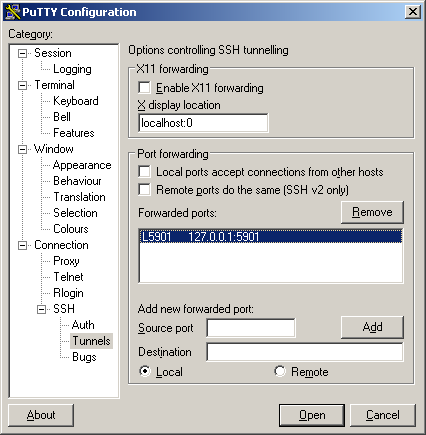
Return to the Session window and click the “Save” button. Your session should now be in the list of saved sessions (along with the “Default Settings” session).
To load a session, select it from the list and click the “Load” button. To start the loaded session, click the “Open” button.
Once you have logged in to your SSH server, whether via the Cygwin SSH client or the PuTTY SSH client, you are almost done.
Step 4.4 – Point VNC Viewer at the SSH Tunnel.
The final step is to connect to your VNC sever via the SSH tunnel you just created. To do this, open the VNC Viewer application (or the VNC client of your choice), and enter an address of the following form (“127.0.0.1:5901” in this example):
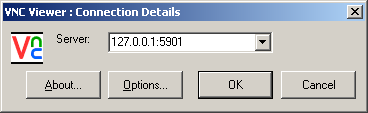
If everything is set up properly, you’ll get a login prompt:
If you close your SSH session, the VNC session will terminate, since all of the VNC traffic is being sent securely over the SSH tunnel.
As before, you can create a shortcut to your secure VNC session. Copy the VNC Viewer shortcut to your desktop, and edit the “target” line to include the address of your VNC server. The “Target” field should contain something like the following:
“C:\Program Files\RealVNC\VNC4\vncviewer.exe” 127.0.0.1:5901
Remember that whenever you want to start a secure VNC session, it’s a two-step process.
– First, establish the SSH session (via Cygwin’s SSH client, the PuTTY SSH client, or any other SSH client).
– Second, start VNC Viewer (or any other VNC client).
That’s it. Happy and secure VNCing!

Thanks for the great guide, Erik.
Following your instructions, I succeeded in 1) getting the SSH server up and running on a Windows XP box, and 2) establishing VNC control of the remote XP box from my Mac G5 (OS X 10.4.9).
But I haven’t been able to establish an SSH tunnel from the Mac to the PC.
I’ve tried turning the CYGWIN sshd service on and off, but that didn’t help. (It starts and stops successfully, though.)
I’ve spent hours googling but can’t find anything except suggestions to modify various configuration files on both the Mac and the PC. Nothing about a Mac to PC tunneling issue exactly like mine.
Here’s the complete terminal record for one failed attempt to connect to the XP box (IP numbers changed):
mark$ ssh -v 00.00.000.173
OpenSSH_4.5p1, OpenSSL 0.9.7l 28 Sep 2006
debug1: Reading configuration data /etc/ssh_config
debug1: Connecting to 00.00.000.173 [00.00.000.173] port 22.
debug1: Connection established.
debug1: identity file /Users/mark/.ssh/identity type -1
debug1: identity file /Users/mark/.ssh/id_rsa type -1
debug1: identity file /Users/mark/.ssh/id_dsa type -1
debug1: Remote protocol version 1.99, remote software version OpenSSH_4.3
debug1: match: OpenSSH_4.3 pat OpenSSH*
debug1: Enabling compatibility mode for protocol 2.0
debug1: Local version string SSH-2.0-OpenSSH_4.5
debug1: Miscellaneous failure
No credentials cache found
debug1: Miscellaneous failure
No credentials cache found
debug1: SSH2_MSG_KEXINIT sent
Read from socket failed: Connection reset by peer
And I’ve tried this, too: ssh -p 22000 John@00.00.000.173
It failed with the same error message.
Any ideas?
Thanks,
Mark
AHA! Actually I haven’t tried it yet but you are correct, I was pointing it at the server. I thought the localhost command was just a test while you were on the same machine as the server, but now that you say that I realize that the ssh is set up to foward the vnc from the local port to the server port. Thanks for clearing that up!! (the terminology above may not be correct, I am just learning and enjoying ssh, but I do get the concept!)
Greetings Seamus,
If you terminate the SSH session, the VNC session should also terminate. Are you sure you’re pointing the VNC client to 127.0.0.1 (localhost = your computer) instead of the IP address of the server?
Regards,
Erik
Hello.
This is a great article – I have been referencing it a lot as I tried to figure things out.
Currently (as I write this) I am using freesshd on a virtual machine along with realvnc, and it seems to be working fine.
However, when I close the ssh session the vnc session persists. Does that mean that something is not working correctly? ie, is there a way to verify the tunnel, or that the vnc session is being encrypted?
Thanks for this and have a great week.
Hi Erik,
One thing you should mention is that all XP users need to have a password set. Otherwise SSH cannot be established.
Thanks for the write-up,
Rob
Greetings Logan,
Yes, SSH/VNC server pairs is the correct approach. This is how I do it. To make the numbers easier to remember, I keep the last digits of the server’s IP address the same as its servers. So a machine with an IP address or 10.0.0.X would run the SSH server on port 2200X (for example) and the VNC server on port 590X.
You can use BgInfo <http://www.microsoft.com/technet/sysinternals/Miscellaneous/BgInfo.mspx> (formerly from Sysinternals.com, now part of Microsoft) to remind yourself which machine you’re on, what the machine’s IP address is, etc.
Regards,
Erik
Thanks Eric for the quick reply!
I understand running the different VNC servers on different 590X ports…but I need to have 1 external client accessing 1 specific internal VNC server, and another external client accessing the 2nd specific internal VNC server, and so on… I’m trying to setup external access for multiple clients to their own PCs via a single SSH server…8-)
It looks like I’m going to have to run SSH/VNC server pairs on each internal PC with different ports (22000, 22010, 22020, etc) for each SSH server to allow my router to forward to individual internal SSH Servers to then allow specific VNC connection to the correct PC.
This would then allow each individual to access their internal PC from different external locations through 1 set of SSH port forwardings on the router. I had hoped to only have to “poke” 1 hole in my router’s firewall…oh well!
Does this make sense to you? It is a bit late here in Airdrie, Alberta (by Calgary) 10:46PM and my coffee is running low…
Thanks again!
Greetings Logan,
The trick is to run each VNC server on a different port. Use port 5901 for the first machine, 5902 for the second, etc. Then you can VNC-over-SSH to one server (say the one running on 5901), then from there you can VNC directly (skipping the VNC-over-SSH part and just doing straight VNC) to get to the other VNC server on port 5902. You can also run SSH on unique ports for each computer, so that you can VNC-over-SSH to any computer on your network from a remote location.
Regards,
Erik
How do I connect via PUTTY remotely when I have One (1) SSH Server behind a NAT router and multiple VNC Servers behind the NAT router?
I am looking to only forward 1 SSH port on the router to the SSH Server behind the NAT router and use it to connect to ALL VNC Servers behind the NAT router.
Any assistance would be very much appreciated!
Thanks in advance!
Cygwin is a moving target, and some things have changed since I first wrote this article. Note the following changes:
In Step 1.1, you should install Cygwin as an Administrator user.
Also in Step 1.1, it is better to select “Download Without Installing” and then “Install From Local Directory” rather than “Install From Internet.” This will help in the event you have problems with your Internet connection and/or need to repeat the installation on multiple computers.
Also in Step 1.1, it is simpler to select “install” for all of the following packages rather than “default” for them: Admin, Archive, Base. All you need from the Net group is autossh, openssh, and openssl.
In Step 1.3, you should set the ownership for a couple of directories and files before running ssh-host-config. If you don’t do this, you might get errors telling you that the sshd service failed to start. To fix this, run this command before running ssh-host-config:
$ chown system:system /var/empty /etc/ssh_*
Also, when you run ssh-host-config, you will be prompted for fewer questions (not the four shown above).
That’s is. Everything else still works.